This will be a tutorial about sculpting putty or maybe more a review then tutorial, there are many different putties and by far I have not tried them all.
More tutorials about sculpting will follow after this, like figure conversion and so on
There are 3 mayor types:
- epoxy putty
- air dry clay
- oven baked clay or putty
As I hardly ever use clay in my sculpting I will not comment on them because there are plenty more people that know much more about them.
Starting with epoxy putties and my favorite one namely Procreate or PC for short.
Pros:
- its grey, okee this sounds weird does it not grey is a good thing, well yes, it makes shadows far easier to see and because of that details are easier to see so its easier to add more details or see mistakes on your sculpt, the color also makes the sculpting easier on the eyes always a good thing wen doing this as small as this.
- easy to smooth out
- can be drilled and sanded but its hard to get it smooth that way
- has no "memory"
Cons:
- rubbery wen dry, this is why is hard to sand
- 1 of the more expensive putties
company that makes it
http://kraftmark.biz/2017/03/08/procreate-putty/
last time I bought some it was over here, for no other reason then they also had other things I wanted and 1 of the cheaper sources
http://www.greenstuffworld.com/en/procreate/34-pate-procreate-90-gr.html
Greenstuff/Kneadnite or GS
both are the same stuff Greenstuff is just the name that Wargaming company gives it. this is the industry standard for years, but I simply dont like it, good chance that if you have a metal figure the master is made with this stuff, fuuny fact it started out as a plumbers putty.
Pros:
- easy to get every Wargaming shop has it and a lot of modeling stores too
- cheaper if you buy in larger strips and as kneadnite
Cons:
- its green, wen mixed its a horrible toxic green color, its also makes it harder to see detail in it.
- it has "memory"meaning if you push it in it will bounce back a little during drying, not a problem for larger pieces and after time you get used to it but it give a longer learning curve.
- really expensive in the Wargaming shops where only small strips are sold
- where the yellow and blue touches on the strips it starts curing so wen you buy it remove them form each other or you get lumps wen mixed
original company
http://www.kneadatite.com/
not the best source or the cheapest but best known I guess, I never bought anything from GW
https://www.games-workshop.com/en-FI/Green-Stuff
Milliput
most common modeling putty which is I almost hate as it leaves a residue on the fingers wen mixing and wen its a bit older it gets a skin on the unmixed bars, some mix it in other got it off I think it will be lumpy wen mixed if the skill is left on
there are 3 or 4 different version but I have only used 2 the normal and white, white is a bit finer but both will work the same.
Pros:
- can be bought in most modeling shops
- cheap
- likely you will already have a bar at home
- can be sanded and drilled easy as it dries rock hard
Cons:
- does not hold detail very well
- gets a useless skin wen old
- leaves residue on the fingers wen mixing
company website
https://www.milliput.com/
never ordered these online can be bought in many shops
Magic Sculpt or MS
this is my most used putty that dries rock hard, bit hard to explain why I like it more then Milliput I just think it does everything Milliput does just a better.
company website
http://www.magicsculp.com/
more will follow wen I have tried out other putties, Aves I have not tried yet and I will order it soon but for the moment this is it.
http://www.greenstuffworld.com/en/
carries most of the putties I use and good source
Thursday 28 September 2017
Wednesday 13 September 2017
Mechanical infantry man part 1
Meet the Mechanical infantry man, the 2 man version is better known as the Praying Mantis but this 1 man version was build couple of years earlier.
In 1937 EJ Tapp working for County Commercial Cars patented a system of a small tank where a small armored box that could be raised to shoot over obstacles, in 1941 the first version was build, sometimes called Praying Mantis mark 1 but more correct the Mechanical infantry man, the driver was prone with 2 Bren guns (lewis in the patent) in a sort of overhead turret, the idea was really clever but as with all 1 man tanks it was to much for 1 man to handle, drivers complaint about getting seasick as well which is no wonder wen you see the videos of these thingy it goes all over the place, I think they did try to fix that as in 1 clip there is 2 extra bars or more likely pneumatic cylinders going from the front too the box. ooh forgot it was driving with the feet.
Later in 1943 the Praying Mantis was build, based mostly on the Universal carrier, this 2 man version was canceled in 1944, David Fetcher explains it far better then me so see the video below for that.


David Fletcher did a nice but sadly short video about the Praying Mantis version
more later
as always feel free to comment
Greetings Mondria
In 1937 EJ Tapp working for County Commercial Cars patented a system of a small tank where a small armored box that could be raised to shoot over obstacles, in 1941 the first version was build, sometimes called Praying Mantis mark 1 but more correct the Mechanical infantry man, the driver was prone with 2 Bren guns (lewis in the patent) in a sort of overhead turret, the idea was really clever but as with all 1 man tanks it was to much for 1 man to handle, drivers complaint about getting seasick as well which is no wonder wen you see the videos of these thingy it goes all over the place, I think they did try to fix that as in 1 clip there is 2 extra bars or more likely pneumatic cylinders going from the front too the box. ooh forgot it was driving with the feet.
Later in 1943 the Praying Mantis was build, based mostly on the Universal carrier, this 2 man version was canceled in 1944, David Fetcher explains it far better then me so see the video below for that.

 |
| patent drawing, sadly the end result looked a fair bit different and was not of much use |


David Fletcher did a nice but sadly short video about the Praying Mantis version
as always feel free to comment
Greetings Mondria
Saturday 2 September 2017
Russian parachute tank
Going forward with my love for funky 1 man tanks, today its a Russian parachute tank funky design which looks a bit like a shorted BT.
This is the info I found for it translated from a Russian source
The last name of the creator of this invention remains unknown, as does the precise date of its creation, but it can be narrowed down to around 1942-1943. This was a tank meant for airborne troops that could be dropped by parachute. The project was ahead of its time, as similar vehicles were built later.
The design was very well thought out and included calculations of the mass of the hull, components, assemblies, and armament. In addition to the weight of the vehicle, the size of the parachute was also calculated.
The proposed tank carried only one crewman. It would be equipped with a mass produced 100 hp M-11G engine, the same as the one used on the Po-2 airplane. The armament consisted of a 47 mm semiautomatic cannon and a DT machinegun. The armour was also reasonable: 30 mm in the front, 20 mm roof and sides, 10 mm floor, 25 mm rear. The total weight of the fully equipped tank, include the crewman, was around 2600 kg."Parachute tank"
This is 1 of the few 1 man tanks with anything more then a machine gun, this will overtax the single crew member even more then other design but giving the limits of aircraft loads there is not much choice. What the drawings does not make clear is how the power was going to the wheels, there is no real sprocket or a gearbox shown, this could be in other drawings or someway inside the suspension arms, which are big for just suspension arms and the front wheels does have something drawn there but I'm not sure what that would be and looks more a way to steer. A 100hp engine is a bit overkill for a 2600kg tank, half would do fine and save a lot of weight, I think the designer picked this because it was a aircraft engine and maybe that was good for a airborne tank, bit weird.
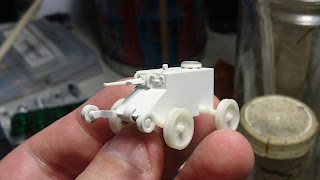
In my model I did change a few things
-changed the 47mm, which looks more like a French gun in the drawings then a Russian gun, to a 45mm gun, followed the 45 mm tank gun model 1932 (20-K) design as that was the standard caliber of the time.
-added a view port in the front, simple design close to what was used on the T-60 and BA-64.
-added a engine hatch with a couple of bolts and a exhaust to the rear.
-not sure yet if I will add tracks, drawings does not show any, left off to save weight? But BT tracks would fit the looks of this little machine. The sides look a bit plain and not sure yet if I will add something there maybe tracks storage.


 I did made a mistake with the MG but that is fixed now, changed it from a infantry DP MG to the tank MG the DT
 For the model I started with a fast build 1/100 BT kit from Zvevda, it looked a lot like it but just smaller, plus the kit was really cheap so no worries if I cut it up and made mistakes, well that did not turn out well the wheels where much smaller then I needed them to be and the nose was more work to fix then just starting from scratch, so that is what I did, made myself a set of wheels close to the BT wheels just without the holes in the rubber, the hull is a simple box and was also pretty easy to make, gun barrel was made out of 3 pieces of round stock, I followed the dimensions of a metal barrel I had but as that had an extra step, armored sleeve, it was of no use for me.
EDIT: Yuri saw my post on FB and posted more info including a drawing with measurements and as I geusstomedeted my size it a bit off, height and width are pretty close less then 0,5mm off but the length is off by more mostly in the nose mine is too pointy, more over at his blog
https://yuripasholok.livejournal.com/9361162.html
Thanks for watching and feel free to comment
Greetings Mondria
This is the info I found for it translated from a Russian source
The last name of the creator of this invention remains unknown, as does the precise date of its creation, but it can be narrowed down to around 1942-1943. This was a tank meant for airborne troops that could be dropped by parachute. The project was ahead of its time, as similar vehicles were built later.
The design was very well thought out and included calculations of the mass of the hull, components, assemblies, and armament. In addition to the weight of the vehicle, the size of the parachute was also calculated.
The proposed tank carried only one crewman. It would be equipped with a mass produced 100 hp M-11G engine, the same as the one used on the Po-2 airplane. The armament consisted of a 47 mm semiautomatic cannon and a DT machinegun. The armour was also reasonable: 30 mm in the front, 20 mm roof and sides, 10 mm floor, 25 mm rear. The total weight of the fully equipped tank, include the crewman, was around 2600 kg."Parachute tank"
This is 1 of the few 1 man tanks with anything more then a machine gun, this will overtax the single crew member even more then other design but giving the limits of aircraft loads there is not much choice. What the drawings does not make clear is how the power was going to the wheels, there is no real sprocket or a gearbox shown, this could be in other drawings or someway inside the suspension arms, which are big for just suspension arms and the front wheels does have something drawn there but I'm not sure what that would be and looks more a way to steer. A 100hp engine is a bit overkill for a 2600kg tank, half would do fine and save a lot of weight, I think the designer picked this because it was a aircraft engine and maybe that was good for a airborne tank, bit weird.
 |
| Drawing original posted by Yuri Pasholok |
-changed the 47mm, which looks more like a French gun in the drawings then a Russian gun, to a 45mm gun, followed the 45 mm tank gun model 1932 (20-K) design as that was the standard caliber of the time.
-added a view port in the front, simple design close to what was used on the T-60 and BA-64.
-added a engine hatch with a couple of bolts and a exhaust to the rear.
-not sure yet if I will add tracks, drawings does not show any, left off to save weight? But BT tracks would fit the looks of this little machine. The sides look a bit plain and not sure yet if I will add something there maybe tracks storage.


EDIT: Yuri saw my post on FB and posted more info including a drawing with measurements and as I geusstomedeted my size it a bit off, height and width are pretty close less then 0,5mm off but the length is off by more mostly in the nose mine is too pointy, more over at his blog
https://yuripasholok.livejournal.com/9361162.html
Thanks for watching and feel free to comment
Greetings Mondria
Subscribe to:
Posts (Atom)